
Hi there!
My name is Ness Lockyer from Marley & Lockyer.
I just wanted to say thanks to Lauren for asking me to join this fantastic group of talented guest bloggers on her beautiful blog. You know by now that Lauren LOVES a makeover and we are no strangers to this. I am going to show you all some before and afters of our old Australian home which was built in...
\

1883. This is the original date stone from our house. It is now in the
garden as we have a veranda where this used to be and thankfully the people
who built it never covered it over.
garden as we have a veranda where this used to be and thankfully the people
who built it never covered it over.

BEFORE
Our home looked a little too like a dolls house for my taste, so
we spent 5 weeks painting this old place to look like this...
we spent 5 weeks painting this old place to look like this...
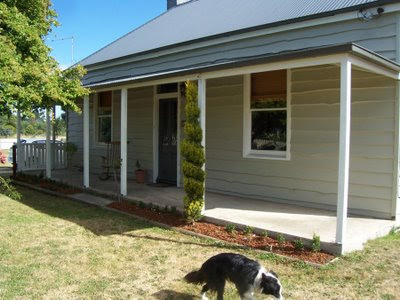
AFTER
We had to remove the old rails as they were all rotten and left it open to let more light in. The cottage flowers have been moved to other areas and box hedges put in their place along the veranda. They are growing nicely now. My Dad done all the wood work, so all we paid for was the materials! We get a lot of people stopping to take photos of this lovely old place, which used to be the Doctors residence in the 1800's. All of the colours are from Dulux.com>. Main colour is 'Warm Grey', trim 'Antique White USA', and the darker grey is 'Woodland Grey'.Dulux>, 'Chalk White USA'. We also had to get a custom hall runner made as our hall
is really wide and a standard size one just looked lost! Buyster
everything you see has been picked up at old wares stores, charity shops, markets and the like.

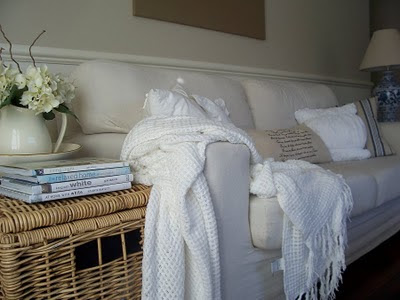
The trunk was $5.00 and all of the pillows on the sofa are from my

BEFORE
Next up is the kitchen. We have an amazing big cast iron combustion stove in here which makes the best winter stews. This shot was taken when we viewed the house and the previous owner was a folk artist and loved the real country look.

AFTER
Gone are the mice and the dolls etc. I gave the mantel a fresh coat of paint and painted the black brickwork in a stone coloured paint, inspired by Tricia Foley's Long Island home.

You can see the stone paint a little better here. This mantel changes weekly, so not many shots of this are the same. This mirror was hung to bounce some more light around and was made by Dad with mirror tiles from Ikea and scrap wood.
 BEFORE
Here is a shot of the kitchen when we viewed the home. It was only recently that I have painted the cupboards. We lived with this 70's wood for nearly 7 years!
 AFTER
AFTERA fresh coat of 'Chalk White USA' and some chalkboard paint made the cupboards look so much better. This was taken before our brushed nickel handles arrived. We also put in a new kitchen window and added the wicker roman blinds. The iron chandelier above the table was $10 from a cheap junk shop. The bloom sign was painted by me from left over exterior paint and scrap wood (and I know it is crooked in this shot, it moves all the time). I really like this space now.

BEFORE
Next up is the bathroom. It actually looked worse than this when we bought it can you believe?! The bath was black, the walls were a bile creamy colour and it had a yellowy pull down blind on the windows which stopped any light coming in.

AFTER
A coat of primer over that cheap pine and some white enamel paint and a fresh coat of white on the tub outside has made such a difference already.

BEFORE
Now for the inside. This was the dark hallway when we first moved in. There was really thin ranch board (the fake wood stuff) on the walls and a very dated colour scheme. Oh, and the red carpet we named 'Prostitute Red'...it was horrid!
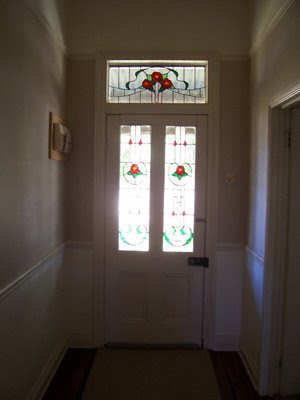
AFTER
Much better. New plaster board, polished floor boards and a lighter colour palette let so much more light in and all of this was done by my Husband, Mic, his Uncle and I.

BEFORE
This shot doesn't do that red carpet justice!! The old arch in the hall way blocked a lot of light also, so it had to go too.

Another angle of the hallway. This is when I painted it white and it was this way for about a week. Mic didn't like the all white, so I painted it back to a shade he thought was the original!!! All of the carpets were ripped up and the original boards were sanded and polished with a high gloss. We had the pro's do this as there was a lot of work with the old wood.

The colour in here between the picture rails and chair rails is a custom colour which I matched from a piece of linen and the white is from

I am sorry but I couldn't find any before shots of our living area. This is the family room and we have a main living area which is our main bedroom at the moment (I will show you in a moment). The same colours are carried through in here and we added the double French doors as the windows were rotten and could not be opened and I am a fresh-air-aholic!. We get the most amazing breeze from the ocean through these doors as you can see.
 Here is a shot through the French doors. The light fitting is from .We have since ripped up the disgusting linoleum floor to expose the original Tasmanian Oak floorboards from the 1880's. Mostly they are in great condition, but there are a few which we need replacements for and finding them is proving to be difficult. They are an inch thick and you can't put new ones in as they stand out (we tried in the kitchen) and they will never get the patina of old boards...so the search continues. The mirror here is by Dad, and the little cupboard Dad made also out of an old wardrobe to get us by until we renovate this room properly. At the moment our laundry is in here too...the room is massive and we will be adding some walls to section off the laundry from the bathroom...stay tuned!
 BEFORE
We are blessed to have 5 fireplaces in this old home, but they were not all that pretty when we bought it!
This one is in the main living room which is now our bedroom. We don't need 2 living areas as we like to be together. I wanted to show you this one as it is the most dramatic change I think. The old mantel was cracked and my Mum rescued it for her own place (Dad fixed it) and we found a great one in the garage under some old wood the previous owner left behind!

AFTER
We painted this 'new' one white and used the stone coloured paint to cover the Burgundy that was one the tiles, actually it was more purple than burgundy (I have a horrible name for this colour, but lets not go there!).
The purple was painted white also and the red carpet, which had a iron burn right in the middle of the floor, was ripped up and the floorboards painted with> Cabot's Timber Colour in Chalk USA...and what a difference it made. So, as you can see I love a challenge...and a bargain. If you would like to see more, just head over to myblog or to myStore . I would love to have you.
We painted this 'new' one white and used the stone coloured paint to cover the Burgundy that was one the tiles, actually it was more purple than burgundy (I have a horrible name for this colour, but lets not go there!).
The purple was painted white also and the red carpet, which had a iron burn right in the middle of the floor, was ripped up and the floorboards painted with> Cabot's Timber Colour in Chalk USA...and what a difference it made. So, as you can see I love a challenge...and a bargain. If you would like to see more, just head over to my
Thank you again Lauren for asking me to take part. I enjoyed finding the old photos.
It just reminded us how far the old place has come.
It just reminded us how far the old place has come.
Ness xx
-------------------------------------------------------------
Ness! THe difference in the house is night & day!! It's so light & airy & easy breezy now. You did such a beautiful job on your home & thanks so much for sharing it with us!!
xoxo,
lauren
-------------------------------------------------------------
Ness! THe difference in the house is night & day!! It's so light & airy & easy breezy now. You did such a beautiful job on your home & thanks so much for sharing it with us!!
xoxo,
lauren