Tuesday, January 19, 2010

Look What Arrived Today! Thank you PVE!!


It's a beautiful little package from Patricia van Essche, of PVE Design!  She did an adorable drawing of a pair of little blue baby booties for the outside of the package and also included a pretty pale blue alphabet chart- both of which will go perfectly in the nursery- for baby Justin.  I'm so touched to have met such wonderful friends this past year and a half.   


In the box was this adorable little hand-knit stem hat (below).  Oh my goodness I love it!!  It went right onto poor Justin's little head for a photograph which he was VERY unhappy modeling for.  (Ah the life of a child of a blogger! He'll learn ;)


Thank you Patricia for this beautiful & thoughtful gift.  It means so much.
xoxo,
lauren

Monday, January 18, 2010

Pure Organization Project #3: If It's Broken, Fix It!!

Hope you're still enjoying the long weekend!!  And now for Project #3...  This one has the potential to feel boring but it is one of those things that just feels so good to get over with.  Nothing very "wow" about it, but when you've done it, you can pat yourself on the back...  or better yet, pour yourself a nice glass of wine. 


It's sad to say but this sconce has been broken since we first hung it up in our bedroom.  It was one of those things, "we'll get to later."  --or so we thought---  A few months later the broken sconce still hung in our room.  It was irksome but really it should have bothered me more than it did.  I actually have quite a collection of broken things around the house.  Why didn't I fix my broken stuff right away you ask?  The answer is simple:  I didn't have any Krazy Glue.  It really took me this long to acquire Krazy Glue.   No joke.  We'd always say "Oh we need glue," but it really wasn't high on the list of priorites with all of our renovating & baby-having, so we went without our glue.  Well let me tell you how much better Krazy Glue got while we were out forgetting it!!  It's got a brush on it now!!  AMAZING INVENTION!!  I didn't glue my fingers together once in the fixing process and only have the teensiest amount of glue to peel off & that's because I'm sloppy & impatient. 


So here's my little collection of broken things (below):  A poor piggy bank lost his ear when we first moved in (my fault I think?), My grandmother's vintage sconce got broken (seriously-  this is real-  6 YEARS AGO when it was hanging in my first apartment's tiny entryway and our very large handsome Danish friend, Esben, walked into it.  The laugh alone was worth it breaking!) and finally, my beloved $5 flea market Wedgewood bowl ( my fault again...  This one has been sitting on top of the fridge in our fruit bowl in pieces for a couple of months). 


SO if you aren't a procrastinator of little jobs (like me) then this week's project might not apply to you at all.  BUT, if you're even a little like me, here's Project #3:  If it's broken, fix it. 


(This can apply to anything:   broken accessories- toys- jewelry, clothes in the mending pile, loose hardware on drawers or cabinets, ANYTHING you've been "meaning to get around to" but just haven't.  ) 


Below, I feel so much better having fixed the sconce!! yay!!!  (It took 1 minute to glue-  why did I wait so long?!!)


Below, my kitchen piggy bank is much better!!!


And finally, here's my sad broken bowl out of commission for months...


...  Glued back together...


... And {almost} as good as new!  (I'm not a perfectionist.)


So, if it's broken, fix it.  And good luck.  It's honestly not as bad as you think!


xoxo,
lauren


ps-  I was REALLY dragging my feet this week so good thing I promised results or I would have given up ;) 

To check out readers' awesome takes on Project #2, go to the previous post here

Sunday, January 17, 2010

Project #2: Organizing the Coat Closet- Reader Projects

Last week's Project #2 was organizing the coat closet and I got some great photos of projects from readers!! Here's ours, below:


Many of you had already tackled this project brilliantly & needed no help from me, but it was so awesome to see your creative solutions & thank you for sending them in.  First is Elisabeth from BOVAGOODS and how adorable are the rows of pegs outside the closet for her daughter's things??  I love the periwinkle blue too! Does this not look like it's from a magazine?!!


And here is Chelsea's coat closet before:


And here it is now:  Super-organized, she's even made an accessible spot for her cleaning supplies!  I also love the clear hanging door rack because you can really easily see what's inside:


Sarah from Miss Trixie's Table (who's 37 weeks pregnant & nesting hardcore!) did a beautiful job too.  Here's her before:


And here's her 'after':  LOVE the color of course (she had it leftover in the garage) and it's organized to perfection...  even the coats are color-coded! 


Tina, below, took a plane Jane organizer & made it pretty & personal with some turquoise Martha Stewart twill ribbon.  Go Tina!!


Lisa from Lists in My Pocket  used labeled baskets for pretty storage.  Here's her before & after:


How cute are the baskets?!!


 Christel, below, a home stager, took her once- average closet: 


...  And used this an adorable red check to make it fun & unique.  It's adorable!  She mentioned how important it is for staged homes on the market to have attractive & organized closets.


Yvalie took this dark space here:


And totally freshened it up into a bright & welcoming mud room.  How amazing is the antique harp case she found to use for storage?! 


She stores hats, gloves, mittens, bags, etc in there.  I've never seen aything like this!  So creative...


Kacey at She's.No.Martha uses the pocket door hanger and also mentions that having coat hooks at her children's height is a huge help & that thay hang their own things up 75% of the time - which is 75% more than happens in our house! :)  Love these pretty glass hooks:


Devon of The Wisteria House sent me photos of her coat closet and it was when I saw this beautiful coat closet a year ago on her blog, here,  with moss balls in the forefront, that I knew she had an amazing touch:


I can't get enough of the paisley fabric!!!  JUST HEAVENLY and I'm jealous (boots too please! :): 


So thank you everyone so much for being up to the challenge!!  I LOVE seeing your beautiful handiwork & creative solutions!!!


xoxo,
lauren

Friday, January 15, 2010

I LOVE LAMP: My Faux Bois Flea Market Find

Last weekend I made it out of the house!!  wahooo  (I really do just hibernate after I have a baby.)  I headed to the "DC Flea Market" in Chantilly with one of my best friends, Lindsey.  We CONQUERED that place in 3 hours:  Power-walking & bargaining till it closed.  But my first find of the day was LOVE:  This awesome 1950s Faux Bois Lamp!


When I saw it at first I smiled.  It looked a little tacky as things surrounded by mounds of other things often do at flea markets...  but it piqued my interest.  I took another look at it started to imagine it in the right setting (errr my house ;)...  It had that quirky element I love and the turquoise leaves were perfect for our family room.   It was interesting & unique & overscaled and I knew it could be beautiful!  (AND I've  been looking for a lamp to replace the temporary tiny one in the family room that belongs in the baby's nursery.)


At first the 3 shades kind of threw me off.  We don't really see much of this anymore.  But again, this is part of what attracted me to the lamp.  And I love the stars on the shade...  It's beautiful when lit but I coudn't get a good photo of it.  The lamp was marked at $65, but I very nicely asked the dealer what his best price was and he kindly dropped it to $50.  SOLD. I did a little research on faux bois and any faux bois over 50 years old is considered an antique & is highly collectible if it's in good condition.  yay!  I wonder if I got a deal?


The faux bois is a fun play on all the real driftwood we have in our family room like this huge cypress root by dad found while fishing in Georgia:


My "end table" next to the sofa is actually a console table standing in until the right piece comes along & attacks me at another flea market or thrift store.  To get the lamp at the right height and to keep it from receeding below the arm of the shelter sofa, I piled a few books under it.  The artwork above the sofa is a growing collection of flea market & thrift store paintings I've been collecting.


  I know it's not a piece that's to everyone's taste, but I'm so happy with it!!  It''s such a unique & personal find and I love incorporating accessories like this into a room.  Our family room is a fun, playful place & nothing in it should be taken too seriously.   (My cousin was over with her new boyfriend the other night & he looked around the room and said, "This is a fun color."  The first words out of my mouth were, "Who told you to say that?!" and looked accusingly at my husband & cousin.  Both shook their heads in innocence and I realized he'd come up with it all on his own. =  Best compliment ever because that's exactly what I'd assured my skeptical husband about the wall color before it went up & what I've been going for in this room all along! ;)  One last little pic of my lamp.  I repeat:  I LOVE LAMP.


Have a great weekend & keep sending me your Project 2 Closet pics!!  Thank you- I LOVE seeing your takes on the projects!!
xoxo,
lauren

ps- Sofa: discontinued Restoration Hardware Sofa
      Striped Blanket:  Dash & Albert

Wednesday, January 13, 2010

Eddie Ross: Before & After Guest Blog

Hi, everyone! Eddie Ross here. I'm super excited to be able to guest blog today for Lauren, one of Jaithan's and my closest friends! It's not something we do very often, but Lauren's definitely a designer after my own heart. I love the way she mixes new and old, classic and modern. She has amazing style and is so humble about it! Can you believe it's been over a year since we all met on our first shopping trip to the New York City flea market? In the blogging world especially, you never know whom you'll meet if you just put it out there!


FleaMarket


Speaking of the old becoming new, here's a quick before and after with a sweet, little tray I picked up last week in Atlanta. I'd been looking for a piece with handles that went with our bar cart—something I could could cary and serve, say, two or three drinks at a cocktail party here at home. You never know when luck is going to strike, and this time around, it was at a tiny, hole-in-the-wall thrift shop in Norcross on our way to Larson-Juhl to prep for the framing party. It's a faux bamboo brass tray, probably, from the 50s, so stained with water marks, even I wasn't sure it would come clean. But for $2, I was willing to take a chance!


Bamboo1


Flash forward, and we're back upstate, unpacking from the trip, when out came the tray, soiled and spotted as ever. Quickly, I went to the sink or, as I like to call it, the Restoration Department. Out came the gloves, Brillo pad and Brasso, my favorite polish for brass. Call me crazy (compulsive, neurotic, etc.), but I love taking something like this forgotten little tray from trash to treasure. A little polish goes a long way!


Bamboo2


Fifteen or so minutes later—"scrub, Christina, scrub!"—and voilà! I love how the tray turned a nice matte finish while the crevices kept their tarnish, accentuating the bamboo. Here's something that cost all of two bucks that now looks like it could have come from the 7th floor of Bergdorf Goodman!


Bamboo3


So where to use it? On the dresser as a vanity tray for cuff links and cologne? Passed hors d'oeuvres at cocktail hour? How about lining it with a pretty linen napkin for rolls at a dinner party? For now at least, I'm taking the Rat Pack-route, propping it appropriately with L-monogrammed highballs from our Etsy shop, Grecian lowballs from our friend Steve McKenzie, a shaker we picked up in Kansas City, and an Italian tiered tray from the Goodwill.


Bamboo4


Talk about trash to treasure! Cocktails, anyone?


-----------------------------------------------

Ahhhh love it!!!  Thanks so much to Eddie & Jaithan for putting together this awesome before & after.  The tray is GORGEOUS & I love the Ratt-Pack-esque cocktail set-up above...  SO ready for it after 9 months!!  (and for $2?!!!  INSANITY.)  I'm always floored by everything Eddie does but am never surprised by its perfection...  Mm mm good! 

xoxo,
lauren

ps- Guest Blogger up next week:  Maria Killam the Color Queen of Colour Me Happy!

Tuesday, January 12, 2010

Really Love This...


I'm dying to use this chandelier made out of capiz shells somewhere- be it my house or a client's!!   (I'm running out of light fixtures to replace in my own--eek! ;)  It reminds me a bit of a vintage sputnik chandelier:


It's the Pearl Lotus Flower Chandelier from VivaTerra and depending upon the size is either $329 or $649. 


On another note, I'm so behind on my emails & my blog reading and am really sorry if you've emailed me & I haven't gotten back to you.  (Just trying to stay afloat over here with the new little guy.)  Please feel free to email me again if you had a question I didn't answer. 
xoxo,
lauren

Monday, January 11, 2010

Pure Organization Project #2: Coat Closet Makeover

Hope you had a great weekend!  Ready for Project #2?  (In case you're new, we're attempting to do an organizational project almost every week of 2010.  I'll show how I did it & then I'm inviting you to come along & do the project at home & send me pics.   This way, we are sort of holding ourselves accountable to each other ;) Before I get to Project #2, I wanted to share some reader photos of Project #1 from last week.  Thanks so much to everyone who followed along at home!  I love how each person took her own unique angle on the project.   Here's my version:


Tina, in Austalia, used these beautiful Martha Stewart tags for her leftover paint:


She wrote, "I used simple twine and my precious Martha Stewart gift tags that I have been saving (lets face it they are too gorgeous to give away on a gift only to be tossed into a bin!!)"  SO pretty!!!


Berta, in Virginia, used this cute little bear container below for her paint:


Yvalie used these mini paint cans for her leftover paint.  She attached typed labels (the words are in German) to the cans along with a sample of the paint on the lids.  How cool?!!!  Love that perfectly clean metal:


And finally, Jennifer found this great idea in Parenting Magazine of using pversized pill boxes for your paint samples.  perfect!!


Thanks so much to everyone who joined & is planning on joining in!  Just knowing we're working on the projects together makes it less of a chore!!


And now onto Project #2:  Organize the Coat Closet

I'm actually embarrassed to show you the 'before' pic of our coat closet.  Yes, we've been living like this.   We threw our shoes in the bottom of the yucky closet where they got smashed & lost.  An overflowing box sat on the shelf and it housed all of our hats, scarves, mittens, gloves, etc.   Miscellaneous items like extension cords and shopping returns got thrown in the mix.  Uggggggh:


And here's our coat closet now:


We took all of this...


... And removed it so we could paint the walls in aqua paint (leftover from our basement).  The best part about this project was that it cost $0 because we just used things we already had. 


The first the step is getting everything out & starting from scratch.  For me, I enjoy projects so much more when they can be a little pretty.  Clearly the closet would be just as functional without the aqua paint, but opening the closet door & seeing this fun color just makes me happy, so it was really worth repainting.  (Thank you Dave!!)     


Next on the "pretty list" is matching hangers. They're a MUST. If you don't have them already, just head out to the store & grab some- even Home Depot sells them. I love Ikea's (cheap!) wooden hangers & have been using them for years so I can tell you they hold up well.


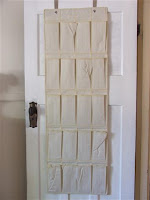
The closet door is an often-underutilized space for storage.  Here, I hung a canvas shoe organizer and filled it with all of our winter accessories:


If you have kids, you can put their things at the bottom to encourage them to put their things away by themselves:


We're trying really hard of getting into the habit of heading to the coat closet with all of our winter gear on instead of dropping it off in the entryway.  (Our coat closet is up the stairs & down the hall-  argggg.)  It looks like we need to put Christian's hat on the next row down:


I put our lint-rollers in here for a quick fix on the way out the door:


I switched out the overflowing box on the shelf...


...with a basket we had.  The basket is a lot bigger & (now emptier) and we'll juse it to corral miscellaneous items like shopping returns and anything too large to fit in the door organizer.  (I think empty overflow storage is a good idea if you're anything like me & just need to stash things for quick clean-up sometimes.  When they get too full, make sure to clean them out. )


Here's our mess of shoes before:  (so embarrassing! :)


And now it's so much better!  Dave made this awesome angled shoe rack out of leftover wood:


It's a shelf attached on the sides with a little lip at the bottom so the shoes don't fall down.  We put it in all the way at the front for easy access to the shoes and because there's hidden dead space in the back where I put the shoes we rarely use.  (Again, another overflow space:  it'lll get messy but I won't see it on a daily basis and when it gets cluttered, I'll reassess.)


Having the shoes down low, again, encourages little ones to help:


Christian was so proud of himself for putting away his shoes (a little crookedly! ;) on the shelf. 
"Yay!!!" he said:


This project has made us feel SO much better!!  I don't dread stuffing shoes in the closet or rummaging for Christian's hat when we're running late.  Everthing has a place and that's the key to getting it right:  just make sure everthing that will realistically be in the closet has a spot.  (1)  Then, use your door for storage (2) by getting a shoe organizer or some other type of system, make sure to use matching hangers (3), and add in some type of empty overflow space (4)- like the basket.   Finally, if you're anything like me, making it pretty (5) somehow- whether it be paint or wallpaper or color-coding your coats or a pretty box or anything else- will make you so happy when you open that door. 


Hope you enjoyed & I look forward to seeing & hearing about your projects!! (Just send me an email by Sunday if you want me to include your project in next week's post.)   Did anyone else join in last week? 

xoxo,
lauren