Showing posts with label guest blogger. Show all posts

Tuesday, May 11, 2010

Guest Blog Before & After


Please welcome Michele Ginnerty from My Notting Hill!  Michele has been so warm andwelcoming to me as a local DC blogger & I can't thank her enough.  She sent me this post months ago and I had to push it to the end of the guest blogger series because I had formatting issues and she's waited so patiently for me to post...
-------------------------------------------------------------------------

 
A huge thank you to Lauren for asking me to participate in the Guest Blogger Before & After series. I couldn't help but think after she uploaded my post w/these very scary pepto bismol pictures of my master bath that she might have second thoughts about having asked me. (I can't even believe I'm letting people see this!) And, here's what's even scarier - we lived with this bathroom for 10 years (!) although the crazy peeling paint problem happened within the last 6 months.

 
These pictures were taken in the midst of sanding and scraping, just before all the fixtures were removed. The previous owners had leveled the "vanity" with pennies.


The room is 4' w x 5' d with a shower off to the right side. The overhang to the shower trapped in steam and made the 30" square shower feel even smaller. For a number of years, we seriously considered having the bathroom gutted and completely redone. These 1950's ceramic wall and floor tiles are set right into mud and typically take close to two full days to bring down to the studs. My husband has already done so much to the house that asking him to do this wasn't an option and contractor quotes for the demolition alone ranged from $1,500 - $4,000. Plus, I really like the look of the old black bullnose tiles. In fact, if the pink tiles had been white I wouldn't have even considered demolition.


Since I had a successful experience painting the trim tiles in our hall bath from ugly seafoam green to gray, I decided to paint the pink tiles white. I used two thin coats of Sherwin Williams Prep-Rite Interior/Exterior Bonding Primer and two coats of Benjamin Moore Decorator's White. I know there are specially formulated paints for ceramic but I didn't want to be exposed to the fumes. Plus, these tiles won't regularly come into contact with water.


For years I had kept my eye out for a narrow vanity. This year Ikea came out with the Lillangen, which offers both concealed storage and creative two-sided open storage. This model is 24"w x 16"d x 36" h. I bought the beech version because I find the wood finish is easier to paint than the white melamine option.


The cabinet is painted Farrow & Ball's Pavillion Gray and the walls and ceiling are Benjamin Moore's Bunny Gray. The floors are 1 x 1 Bianco Carrara honed marble surrounded by a border of 3 x 6 honed subway Bianco Carrara.


I don't have it pictured here but we had a Panasonic Whisper ceiling exhaust fan installed. We were so happy with the Toto Aquia Dual Flush we put into our hall bath that we used it again here.


The Ikea sink only had one opening and I wanted to avoid a single lever faucet so I chose Porcher's Reprise faucet in chrome. The handles are labeled hot and cold and they have a nice feel to them. Off to the left is a Bombay Saphire gin bottle converted into a soap dispenser. You might notice the faucet is off center by about a 1/2 inch. I forgot to take into consideration the cold water valve when measuring!


I have to admit when we first installed the sink, I wasn't sure I liked it. However, it's extremely functional and there's no longer complaints on my end about water puddles left on the sink counter. So in the end, I really like this style for our narrow bathroom.


Here it is with the tray - which is how we really use it. It provides a convenient place for toothpaste and to set down things, etc.


What's Still Left to Do: A bit of pink still remains! In the spring I will hire the same company that reglazed our hall tub and have them do the shower tiles in white but keep the black tiles so it will be consistent with the rest of the bathroom. I'm waiting till warmer weather because I want to be able to have all the windows open, with fans blowing out all the fumes created when reglazing is done.

The window needs to be treated and I'm planning to have white vinyl plantation shutters installed. Here they are in our hall bath. The gray trim tiles were seafoam green before being painted gray.

 
Since the walls are looking a bit plain, I'm planning to stencil them for interest and am inspired by this bathroom by Phoebe Howard. Still haven't found the right stencil yet.


Southern Accents, July - August 2008, designer Phoebe Howard, photography by Roger Davies

Breakdown of Cost:

Lillangen cabinet and sink: $229
Mosaic and subway tiles: $740
Installation of floor, labor cost: $800
Porcher faucet: $270
Toto Aquia dual flush - $392 from Cowan Supply in Atlanta
Paint: $100
Ceiling exhaust fan and installation: $400

Total cost so far: $2,931.

Estimate for shutter ($250) and reglazing of shower stall ($400):
$2,931 + $650 = $3,581

Hope this post was helpful for anyone considering another option besides demolition of an outdated bath and that you've recovered from those pepto-pink before photos!

----------------------------------------------------------

Michele-  you've done such an awesome job so far!!  The floors are incredible and I love the Ikea sink.  You can't even tell the tiles used to be pink and it's so great that you worked and can't wait to see the stencil!!!

Wednesday, March 24, 2010

Guest Blogger Before & After: La Dolce Vita

Today for out Guest Blogger Series, please welcome super-stylish Paloma of the beautiful blog La Dolce Vita!

{After: Our Guest Bathroom}

I was so excited when Lauren invited me to share a before and after on her wonderful blog, though I must admit, I was a bit intimidated. After all, Lauren is the queen of fabulous DIY projects! I don’t know how she manages to do it all, but she does so beautifully and with grace and kindness.

My before and after is of my guest bathroom which after a few very simple steps, was transformed from drab and predictable to something my husband and I absolutely love!


{Before: The Guest Bathroom circa 2007}

The guest bathroom featured a plain, white shower curtain, the requisite blue and brown combination that everyone was doing, and the original walnut cabinets. Looking at this makes me cringe now. The paint color (Benjamin Moore’s Plymouth Rock) is about all that remains.


I had spotted this shower curtain at Target, which reminded me of Kate Spade’s which was featured in Domino a few years ago. I sort of built my vision around it and got to work. I love the look of the curtain with the framed fan coral and monogrammed towels.

{Kate Spade’s Shower Curtains}


{The $30 Target Version}


I have always been partial to the look of white linens, so I ordered these towels from Pottery Barn and had them monogrammed. While I love the look of white towels, they are not always practical, so the linen closet is filled with graphite-colored Cynthia Rowley towels for guests to use when they visit. You’ll notice the hand towels are also graphite. I thought it was a nice, coordinating color.


We completed this project right before Christmas. In September 2009, we traveled to London and in the summer of 2008, I traveled to Spain. I took some of my favorite shots from both trips, framed them, and hung them in the bathroom to add some interest. I chose to print the pictures in color. I thought that having black and white photos would just be too much in a predominantly black and white room.


On the Vanity: A Potted Orchid, Handmade Mexican Pewter Towel Ring, Archipelago Botanicals Diffuser, and a little Japanese bowl from Anthropologie.


The greatest impact came from painting the cabinets gloss black. We couldn’t spend the money for a new countertop and sink, so a little can of paint gave us a lot of bang for our buck! It created contrast between the cabinets and the counter which just wasn’t there with the original walnut cabinetry. If you look at the first two images in this post, you’ll notice the difference is huge!


We contemplated getting a new mirror for a while and a few weeks ago, I suggested that we buy some plain wood trim from Home Depot and paint it gloss black to match the cabinetry. Again, I think this choice made a tremendous impact and really completed the project. Not bad for a project that cost about $15.

I’d say the overall transformation of our guest bathroom cost about $300 and we are very pleased with the difference it has made. Thanks again for featuring my before and after, Lauren!

______________________________________________________
 
Paloma- What a huge difference the simple changes made- it's fresh, up-to-date & graphic & very "you!"  I love the huge monograms on the towels and the black touches throughout.  Painting the vanity really made the space feel so much bigger & prettier.  (And all for only $300?!!  awesome.) Thank you so much for sharing your guest bath transformation with us!!!
 
xoxo,
lauren

Wednesday, March 17, 2010

Guest Blog Before & After: Janell from Isabella & Max Rooms

Please welcome super-stylish designer Janell Beals from Isabella & Max Rooms!
-------------------------------------------------------------------------------------

I feel very honored to be writing this guest post for Lauren and her delightfully beautiful blog today. Whenever I see a new post by Lauren I happily open it, anticipating that I will be inspired.

Today I'm going to recap three of my recent projects, all using chalkboard paint. It seems I have been bitten by the chalkboard craze! It's hard not to be. This paint offers up so many possibilities and it is just such a fun project that keeps on giving after you've stored away the paint and cleaned the brushes.


Project #1: Chalkboard/Art Wall. Here an entire wall became a chalkboard and the backdrop for an art wall in my husband's home office. I had considered several ideas on how to treat the wall behind the photos and images, finally deciding upon chalkboard paint when I realized whatever I did needed to be cheap...


Project #2: Chalkboard Lamps. Yes, I know, this doesn't initially sound like a good idea. But look at the result! I had a pair of lamps that needed a little pick me up as I started working on Max's bedroom. It was a quick project with a fun outcome. And what is best? Max loves them.


Project #3: Chalkboard Stripe. Here a wide chalkboard stripe was painted around the perimeter of Max's bedroom. (I swear, I've run out of the paint and I'm not going back to the store for more anytime soon!) Before starting the redesign of Max's room I had a "client interview" with him. It was amazing how much inspiration and direction I got from his answers. Among his requests for the room was the color black, to bring in a chalkboard and to get rid of the plain walls. It quickly dawned on me that I could easily address all three of these requirements with one item...chalkboard paint. Everyone in the family has gotten in on the writing and drawing, suddenly Max's room is the most popular spot in the house!


So tell me, where would you use some chalkboard paint in your house?

Thank you Lauren for inviting me to write this guest post.

----------------------------------------------------------------------

Thanks so much for sharing these awesome projects with us Janell!!  I love how you did a client interview with Max & have really worked to create a room he loves.  You've used chalkboard paint in such creative ways and I love it!!!   (the frames on the walls/  the lamps/!! so awesome) 

Happy St.Pattie's Day!!!
xoxo,
lauren

Wednesday, March 3, 2010

Guest Blogger Before & After: Camila From High-Heeled Foot in the Door

Please welcome Camila of High-Heeled Foot in the Door!!! :)
---------------------------------------------------------------------------------------
Hi Pure Style Home readers,

Me and Lauren go back a long time. I think I’m actually the first non-family member to ever comment on her blog! Since then we’ve become great friends  and everyday I wish that she lived closer to me! I of course jumped at the chance to guest blog and be in Lauren’s neighborhood (virtually speaking) for the day.

 High-Heeled Foot in the Door

I’m so excited to be here showing you a little before and after that recently took place in my own home. During our many talks me and Lauren came to realize how close we are design wise. We share many of the same beliefs when it comes to decor even though I tend to go more bold & bright in my color picks the basics are the same.

Here is a before picture of the guest room in my home. When we first moved in I had found a paint color I loved and simply painted the walls, added left over furniture from around the house and eventually put some window treatments in place. Ah bad decorator I know!

office-after 006

As other rooms got finished in the house I finally set my eyes on finishing this room.  Because the paint was relatively new I decided to keep that as is. This helped the re-vamp process, because I didn’t need to prep the wall again, prime print.

It now looks like this and is waiting for Lauren to come and stay in it!

guestbedroomtwo

It’s a multiple purpose room with a small office area and a trundle bed with pillows  made Roberta Roller Rabbit napkins! The massive bulletin board was another DIY project that was made from supplies from Home Depot.

guestbedroom3

Like Lauren I believe every room needs a little greenery and in this case I decided to go with some sunny sunflowers.

guestroom5

Storage boxes are piled up top for my office supplies. My individual craft storage cubes got a unified built in look by adding a wood countertop that I stained yellow.

guestbedroom8


I didn’t want the walls to be too busy.  So I placed some token pieces on the wall in a very organic manner. No measuring here!

One of the crucial elements to the room that helps tie in my introduction of yellow are my DIY striped curtains.

guestbedroom9

The room encompasses everything I love, is simple and chic and feels very much like me all essentials for good design according to both myself and Lauren .

I hope you enjoyed getting a glimpse into what happens over at High-Heeled Foot in the Door!

xoxo,
Camila

--------------------------------------------------------------------------
What a fun fresh happy modern space!!  I love the color scheme & all of the cheerful touches. (One of my favorite being the turquoise beads on the white gourd lamp-  just perfect!!!)  Camila, than you so much for walking us through this beautiful happy space of yours!!! :)  Hope you all enjoyed!!

xoxo,
lauren

Wednesday, January 27, 2010

Guest Blogger Before and After: Jennifer from The Newlywed Diaries


Hi everyone, it's Jennifer from The Newlywed Diaries here to show one of my favorite spaces in my house. First off, I just want to say that I am by no means a professional designer. I'm just a young newlywed with a desire to create a beautiful home on a real budget.


We're coming up on two years in our house, and the dining room is just now feeling "done" -- it started out as blank as it could get. It is between the kitchen and the living room, so we spend a lot of time there and wanted it to be multi-use space that was pretty and functional.

My mom found this barley-twist table at auction for a steal and gave it to us has a housewarming gift. Having a table in the room was definitely a step up from the months when our old sofa was against the wall (luckily no pictures of that exist).


Also in the room is a pair of chairs that my great-grandmother bought in the 1960s. They are in a great condition as they sat for years in a living room that was seldom used and then in an out-of-the-way corner in my family's lake cabin. I rescued them from being sent to the Goodwill when the house was redone and I love their French-inspired lines and don't care that they were mass-produced. Before: The pea-green chenille upholstery left a little to be desired.


After: I had the chairs were recovered in a simple linen with blue paisley embroidery and I cannot even express how much I love them now. (Photo by Becky-Luigart Stayner).


The other big piece in the room is a simple dresser (which also came from the lake house -- I'm not one to turn down free furniture!) that we use as a sideboard. Before: It was pretty dingy and the square drawer pulls were strange.


After: I cleaned it up and added a few coats of paint (Benjamin Moore's Stratton Blue -- leftover from my mom's living room). Oh and new hardware, though to be honest, I think I'm ready to replace those already (whoops!).

Having extra storage here has been essential. Our house is without a defined entry, so the table becomes the dumping spot for mail and whatever else. Those drawers hide a multitude of sins, and Lauren, I'm waiting on you to do a drawer clean-out so I can join!


So this is how we lived for a while. Totally fine, just nothing special. The walls are painted the same color as the living room (Benjamin Moore's Grant Beige), and my handy husband even added crown molding (painted BM Bennington Gray). Oh, and there's our dog, Maddie, can't leave her out!


Things really started to come together when we found an old lantern at a local antique shop -- exactly the kind we'd been looking for! The brass had been painted with a steel blue-gray color that went perfectly with the adjoining living room.
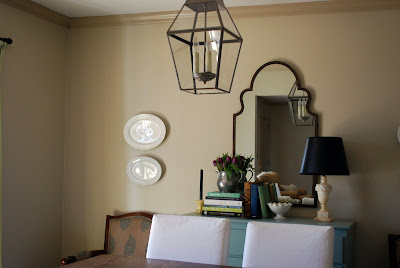

We had it rewired and wow! It really made a difference in the room. It was definitely the biggest single expense in the room, but was around what you might pay for a new lantern that size (believe me, I've looked at them all!). For us, its an investment that will definitely be coming with us to the next house (sorry, future home owners). The mirror was a Christmas gift from my mom last year (Brayden Arch by Uttermost, if you're interested).


Here is the room today. I hate to say "finished" because I'm like Lauren -- always moving things around -- but all of the big things are in place and we're quite pleased with how it's come together. The white upholstered chairs are our first Ikea purchase. They are super-comfortable and you really can't beat the price. It was a little scary to eat on white at first (though I actually served a red sauce the first time we used them!) but the slipcovers are machine-washable and can be purchased separately if one gets ruined.


The chairs sit under my "ironstone" platters which came from HomeGoods (my favorite!). The seagrass rug is another great HomeGoods find that really helped the room come together.


The top of the blue chest gets changed with the seasons (and according to my mood) and right now it is holding some meaningful things: the ceramic candle holder was Wes' grandmother's, the books are on my favorite subjects (decorating, collecting, cooking, old houses), the pewter pitcher has some grocery-store tulips, we picked up the old books at yard sales and flea markets, and the ruffled bowl holds Werther's candies -- Wes' favorite! I bought the marble lamp on a shopping trip with Eddie Ross in Atlanta, and the shade is from Martha Stewart's collection at K-Mart, which I dearly miss!

Whew! I think that was the longest post I've ever written -- hope you're still with me! Lauren, thank you so much for including me. I hope to meet lots of new blog friends!

--------------------------------------------------------------------------------

Oh.my. goodness.  Jennifer thank you so much for for sharing your gorgeous dining room with us. I think I can safely say that we're all crazy over that chair fabric!!  Your style is so beautiful & I love seeing how your space came together with things you already had & were able to completely renew.  Thank you for sharing!!

xoxo,
lauren

ps-  Don't forget to vote for Eddie's Bloomingdale's Window!  ( link at the top of the right sidebar) Dave & I are headed to NYC to celebrate (fingers crossed!) Eddie & Elle Decor's win and I'll be sure to take lots of pictures!